5 Tips on How to Take to Perfect Instagram Photos
After blogging for a few years now, and getting more and more interested in all aspects of design, from clothing to food to architecture, I've developed a love for taking beautiful Instagram photos. I love arranging items in an aesthetically-pleasing fashion to capture a moment.
I often get asked about the apps, camera, and techniques that I use, by those who want to learn how to take better Instagram photos. So I decided to create a step-by-step guide to break it down for all those wondering. I know for bloggers and entrepreneurs who are working to build a social media presence that it’s crucial to polish up your Instagram skills to make your account look its best. These tips are sure to give your skills a boost!
1. Use a quality camera phone.
I'm somewhat biased towards iPhone cameras, but they take the best and most crisp photos for Instagram, from my experience. Starting with the iPhone 5 to the most recent iPhone models, all of these have high quality cameras. The camera does a lot of the work for you, when it comes to taking a good photo, so if you have a great camera to work with, you're already halfway there. I also found this article that has more tips on phone cameras and other alternatives if the iPhone isn't your thing.
2. Lighting must be sufficient.
Lighting is everything to me when it comes to taking photos. If I'm in a place with bad lighting, I don't even try to take photos there. I'd rather have no photos than bad ones. LOL. Natural light is the best lighting, hands down. When I take photos inside, like in restaurants, coffee shops, or even in my apartment, I prefer a space with large windows that allow plenty of light to flow in. If windows are smaller, just being near them when taking your Instagram photos, allowing your subject to be on the opposite side of the light source, will help your photos to look 10x better than if you were in the dark corner of the room.
When having someone take a photo of me, I try to take those photos outside, facing the sun. Imagine a photo shoot in a studio. You see the subject standing on one side, facing the studio lights and the photographer, on the opposite side. That's the same thing you want to do when taking camera phone photos, except the person holding your phone and snapping is your photographer and the sun becomes your studio lights. Finally, if I must take photos inside with no source of natural light, I only do so in a space that has bright lighting. The light makes your photos crisp and sharp, and photos like this require less manipulation to make them look good. I hate nothing more than a grainy, dim photo. Sometimes editing doesn't even help with those.
3. Image composition and balance are key when learning how to take better Instagram photos.
Image composition is important, and even though it's something most people are unaware of, our eyes naturally gravitate towards photos with nice layouts. An example of this is in a coffee shop (my favorite place! ha ha), I will either have a clear background, just focused on the latte or to add more interest, I'll use a cute planner or some other everyday object and capture the photo from above or at an angle from the side. I am sure to have things balanced evenly from left to right to look neat, but natural.
“Image composition is important, and our eyes naturally gravitate towards photos with nice layouts.”
The main thing to remember in this step is to decide which objects you want people to really notice in the photo and are they enough on their own or do you need to add some complimentary objects around them to make it better? Another question to ask in this step is if there too much clutter in the photo and should you take something away for a better image. Colors also add beauty and interest to your photos, so popping in something with color in a plain layout is a great technique. You can use jewelry, books, planners, flowers, nail polish bottles, pretty food, latte art, your computer, trees, shoes, a cup--basically almost any pretty, everyday object can help you to create a sense of artistry in a photo composition.
4. Pay attention to Instagram photos that you like and experiment using trial and error.
Look at photos that other people take and think about what you like about them and why. I love following other blogger's Instagram accounts because I just love design and photography. It's nice to see great work from others and with time, I've started to pick up on how to improve my photos through observing what I like about their photography. I've learned from trial and error, by using their work as inspiration and acting on ideas any ideas that I have. Don't be afraid to experiment. If you don't like what you make, that delete button is waiting for you.
5. Edit the Instagram photos that you take to create a polished final look.
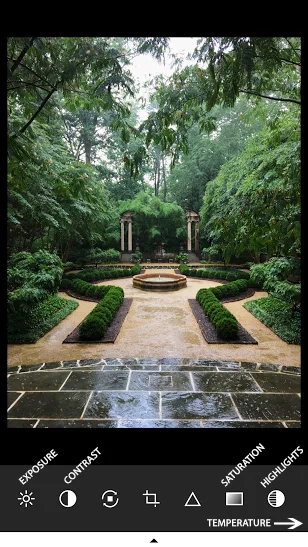
To further enhance your photos, be sure to edit them. My favorite photo editing app is VSCO Cam. This app is available for both iPhone and Android devices. It's relatively easy to use, but it takes a bit of practice. However, once you use it a few times, it'll become second nature. Instagram has also improved their editing capabilities vastly, since the app first came out. I often edit in VSCO cam first and then polish off that edited image using the Instagram editing functions.
The main VSCO cam adjustments I use are Exposure to brighten a photo if it's too dark or to do the opposite if there's too much light, Contrast if I need a bit more or less intensity in darker areas, Saturation to enhance the richness of colors, Highlights to give the photos a bit of a glow, and then Temperature to move a photo more towards the warm or cool side (a photo is too warm if it has a yellow undertone and it's too cool if it has a blue undertone), if needed. I labeled the VSCO cam symbols below as a starter guide for you. Temperature is represented by a thermometer symbol once you scroll over to the right.
That's it. I know it can seem like a lot, but with anything, it's a skill that can be refined and the best part about it is that you make it your own. Don't look at those accounts with those super-advanced photos and feel intimidated or behind. Just keep at it if you enjoy it and you'll develop a refined photo style of your own.
What are some of your tips for taking great Instagram photos for your blog or business page? I’d love to hear about them in the comments below.


